So, this hasn’t worked out quite how I anticipated so far, I’ll have to give it another go later.
You might have seen the hrv_monitor board in a picture I linked a while back – It is intended to be a simple reflective heart rate monitor. At the moment I’m unclear if I’ve badly underestimated how much accuracy I need, or if there’s some other problem with what I did that is more fixable in software…
I built a simple software stack hoping to get some data demonstrating that the device works; and what I’ve found is that the device makes a great near-range reflective rangefinder, but it’s not showing any trace of a heartbeat in my data.
So far what has been done is:
- There’s code for the microcontroller which runs on a timer and collects ADC data 100 times a second. If the PC software is connected, it will send that data over USB.
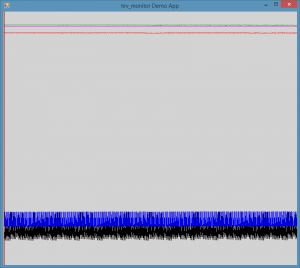
- I built a simple demo app which indicates its presence to the uC, and receives and graphs the data, image below. The black trace is the “dark” measurement value with no LEDs on, and the other 4 lines are the ADC values measured with each of the LEDs lit, in turn.

So well, not everything works on the first try, I certainly don’t claim to be an expert in this kind of biometric sensor and this was a very quickly thrown together side project based on assumptions and not research. Maybe I’ll still get it working though, another time – Too many other projects need attention for now.
In case anyone else is interested, the code and design files related to this project are here: https://github.com/sgstair/random/tree/master/hrv_monitor
I received my Kickstarter RigidBot in the mail yesterday and I’m attempting to put it together. Below are my notes from the process (this will change a bit until I’m done). I’m just using the documentation, may go back over the videos if I can’t figure something out
- Direction the wires should face when assembling the motors is not specified. This always worries me, having assembled printers where this is vitally important.
- Eventually it does cause problems: The extruder assembly needs relatively specific wire orientation; The wires for the thermistor and heater should come out on the fan side, and the motor wires must not come out of the bottom face. I also rotated the PCB from their diagram just in order to be able to connect the thermistor, and the thermistor wire is still a really tight fit.
- The extruder assembly instructions not great: definitely don’t follow the steps in the order shown. I put the hobbed drive gear on backwards from their diagram so the lock screw can benefit from the keyed shaft, it seems like it will work.
- I’m now trying to infer which of the 2 lengths of unmarked steel rods are for X and which are for Y. They only differ by about an inch in length.
- It looks like the longest rods are used in the Gantry assembly (X axis, I assume)
- Most everything else went together pretty simply. It’s the most straightforward 3D printer I’ve assembled so far (took less time than the printrbot simple, much less time than the mini Kossel that’s not done yet, and I never finished the QU-BD after a lot of time, it became the mini Kossel)
- There are some gaps in the instructions. They’re possible to reason out logically/mechanically or by experimenting.
- Reversing the extruder drive gear did cause me trouble later; I took a file to the middle of the heatsink to make things fit. Then I also filed out the attachment holes a bit further out to make them fit better.
- I think the extruder calibration is off, and the PID values are way incorrect for the amount of power they’re applying (24V 17A supply, sheesh)
- Most everything is working now though, will test print soon.
- It doesn’t look like the extruder calibration is off, and it looks like the printer’s characteristics are hardcoded in the firmware
- Test print seems to be working pretty well. The machine appears to be able to print at higher speeds than I’m used to (useful, for trying to fill that giant build volume) – I’ll have to play with settings to see what it can do.

A few more notes now that I’ve had it running for a bit:
- I’m not using any special print settings, just the relatively optimized defaults I was using on the printrbot. About 70mm/s max, 204C PLA, 60C bed - It’s printing surprisingly well on just the aluminum surface (I couldn’t get the printrbot to do that when I first got its heated bed working, but haven’t tried since.)
- The fan must be forced on, or the extruder will fail horribly. I think the firmware detects the jam somehow and slows down printing? Not enough data, but neat if so.
- The firmware seems to have a lower (than I’m used to) maximum acceleration, and there’s a lot of acceleration/deceleration ramping as a result.
- I removed the fan grille on the extruder and replaced it with some washers, because it was blocking the fan (probably due to overtightening). The heatsink really needs to be tight against the aluminum mounting/feed block.
I am seeing some serious weirdness with printing now that I’ve tried a few more things; The print speed decreases over time.
I’ve been printing MrJaws v2 to test with, and while early layers take ~50 seconds, layers around 30 are taking around 3 minutes each, and each layer is basically the same…
I just started a new print after killing one that was going very slow, and now it’s going extremely slow on the first layer. I suspect it must be something in the firmware but I’m not sure what yet.

